


‘Love at first sight’ is not the phrase Alex and her husband J used to describe their initial reaction to this 1970s home in a village near Leeds. After they sold their previous home, and Alex became pregnant with their second child, they were pressured to find a new place to live – fast. “We eventually bought this home for the location,” Alex says. “The village has a good school and we have a really big garden – but the area we live in was the nicest thing about the place. Sometimes I’m not sure why we do that!”
Given the condition of the property when it was purchased for the couple, it’s no surprise that he felt it was a bit stressful. The house needs a complete renovation. “The last owner was the only person who ever lived here, and you can tell,” Alex says. There was not even central heating – only heating with warm air, no radiators. This is how dated it is!
profile account
the owners Alex Watson-Usher (alexandralouisewu), who works in restructuring and bankruptcy, her husband, J, who works for the NHS, and their children Nolita, six, and Delphi, four
Property A four-bed detached house in the 1970s near Leeds
The cost of the project 80 thousand pounds sterling
By Alex’s own admission, she and J proceeded to “mess around” with it pretty quickly. “We demolished all the interior walls in the basement, leaving it unlivable,” she says. “Our renovation story is an example of what not to do!” The entire ground floor was opened to one large area with the help of steel beams. “The goal has always been to extend the rear, so we did the initial renovation work with that plan in mind,” Alex adds. “In fact, we got planning permission for the extension back in January, so we’re all ready to go now.”
The house looks thoughtful and cohesive, but Alex isn’t a mood board person. “I don’t use Pinterest and I’m not a planner,” she says. I’ve always had a strong idea of what I love. I started using Instagram recently and found inspiration for our extension there, but I pretty much go with what I love. For now, until the extension begins, she says her favorite spot is the sofa by the doors. “Girls play with their toys and games here, and I love sitting here in the morning, looking forward to the park,” she says.
1. Make Your Kitchen Design Flexible (So You Don’t Have To Repeat This Later)

kitchen units, IKEA. kitchen faucet Victorian plumbing. bar stools, Dunlam. painted walls in Cornforth WhiteAnd Farrow and Bowl
(Image credit: Katie Lee)
If you know, like Alex, that you’ll extend later, that doesn’t mean you can’t create your dream kitchen now: you’ll just need to make sure it works in the present and in the future. Alex’s kitchen is a simple business at Ikea: Her husband J planned it using an online planner, ordered at the store and installed it himself. Designed with futuristic extension in mind. “The island is huge because it’s connected to these plans, so it’s going to get a lot more proportional,” Alex says. “When we have friends, they congregate here – it’s very social.”
Can’t add a kitchen island or not sure how it fits into your future plans? Check out our portable kitchen island ideas for something a little more flexible. Additionally, be sure to choose a color that matches the layout change later, or choose a kitchen that you can repaint. “We were under a lot of pressure when we chose the kitchen, and in hindsight I might not have chosen gray,” Alex says. “I thought he’d be immortal, though.”
2. Create budget-friendly Crittall doors with electrical tape

Couch, next one. bar cart and rug, lion. Frida Kahlo print, I FYI. hands print, Juniq. Painted sliding doors oleum rust black paint
(Image credit: Katie Lee)
Opposite Alex’s kitchen, a sofa beside the glass doors makes a great spot for morning coffee. “The doors are actually the original white uPVC doors,” Alex says. Eventually the extension would go here, so we didn’t want to replace it. Instead, we painted it black with Rust-Oleum paint and used electrical tape to give it a Crittall-style look. It’s an incredibly simple and effective update. “The difference it made was amazing.”
To get the look, first paint your door frame with a specialized uPVC paint. Next, use a tape measure and a Sharpie to mark the sections you want to glue. Hold the tape taut while applying, then heat the glue with a hair dryer and smooth out any air bubbles.
3. Use Panels to Add Character to a Bare Home (We’re Looking at You, New Buildings)

sofas and rugs, next one. curtains and coffee table, John Lewis & Co. print “Oh yeah”, Designs by Gayle Mansfield
(Image credit: Katie Lee)
Across from the room, the living area is decked out in Alex’s signature wood paneling. “There are no historical features in this house, so the panels add character,” she says. We did it ourselves with MDF and No More Nails. It makes every room feel less of a box.
If you’ve got your hands on it or have fantasized about trying a DIY wall panel, this is a great project to help you get started and build skills.
4. Improve the health of your home and inject some mood-boosting greenery with houseplants
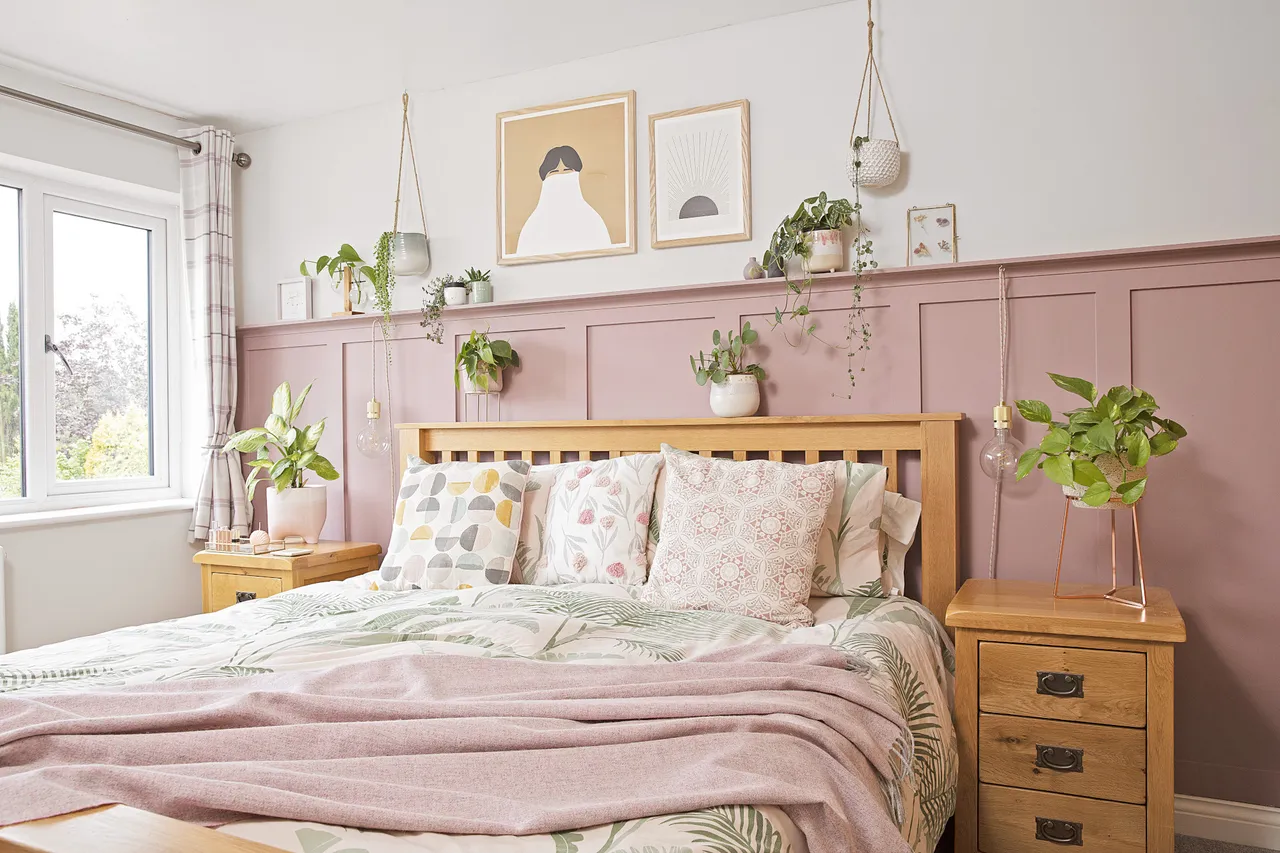
Painted paneling in Sulking Pink RoomAnd Farrow and Bowl. palm linens Marks and Spencer. peg hook, etsy. print “rebel” Modo Creative. prints over the bed, I FYI
(Image credit: Katie Lee)
Anyone who has green spaces in their home will tell you all about the benefits of houseplants: they help purify the air, increase productivity, and even aid sleep. “Everyone always asks, ‘Do you really get that many plants? ‘I own!’ says Alex. ‘I hang them up to get more.’
If you want to add more houseplants to your home, take a leaf out of Alex’s book and think outside the box to save space. If you don’t have many surfaces to place them on, try one of these DIY plant stands—a great weekend project. Additionally, place hooks in the ceiling or walls and use macrame hooks for added texture.
5. Don’t make this major mistake with bathroom floors

Floor tiles, Harvey Maria. painted walls in Jungle SymphonyAnd Valspar. poop, IKEA. Curtains Dunlam
(Image credit: Katie Lee)
“The room above the garage—now our family bathroom—was dilapidated: brick walls bare and filthy,” Alex says. “When the owner gave us the round, he didn’t want to show it to us at first because it was where he stored his collection of weapons!” Converting it into a family bathroom was one of the most challenging tasks in the renovation process. “The garage has an upper ceiling, so we had to build serrated walls to create a more sensible space,” Alex says. “It was hard to manage – we had to shower at the highest point in the room, and the bathroom tucked under the eaves.”
The couple had a flooring disaster, too. “It’s premium vinyl tile, and it was installed on the hottest day of the year, so when the temperature got back to normal, it shrunk,” Alex says. “If you eat the floor there now, you will find the remains of our first attempt under it.” cues from the story? Never try to install a new floor on the hottest day of the year.
6. Use decals to create an on-trend clamshell effect without having to use decals

teepee, Home. set of drawers, John Lewis & Co. study freedom. home rugs, H&M. bunk bed, Happy family. side table, IKEA. gold decal stickers, etsy. “Yes girl you can” print, Oh so Daisy. map print, desinio
(Image credit: Katie Lee)
Have you noticed the serendipitous trend and fantasized about going on your own? You can painstakingly draw them manually – or take a sheet of Alex’s book and take a clever shortcut. “Everyone was painting half-painted walls and cracking,” she says. “These are gold stickers cut in half – I think they really work.”
To recreate the look, simply paint the wall at the height you want (dado’s height is a good idea), then buy circle or semicircle stickers, cut the first in half, and place it along the top of the painted section, using a measure to ensure alignment.
7. Include a daybed in your spare room for bedtime reading and bedtime fun

painted walls in pale powderAnd Farrow and Bowl. day bed IKEA. rug, lion
(Image credit: Katie Lee)
The day bed in the spare room is pulled out into a double bed when the family has guests. “Sometimes we read to the girls here,” Alex says. “The panels were a closure project—when I told JI she wanted to do it, he was like, ‘Oh, for God’s sake! “
Multifunctional furniture like a daybed or sofa bed is perfect for a small spare room where you don’t want to take up precious space with a full size bed. Choose furniture that folds away when not in use, or try investing in pieces that come with built-in storage—like a side table or an ottoman that hides spare lids.